
How to Completely Uninstall Magisk and Unroot your Android Device?
Now, if you wish to uninstall Magisk for any reason, the steps below will assist you in doing so. The most direct way to do this is via the Magisk Manager app itself. Before you uninstall Magisk, make sure to disable and remove all the modules first. Once you have done that, follow the instructions below.
- Launch the ‘Magisk Manager’ app on your Android device.
- Tap on the ‘Uninstall’ option in the app’s main screen.
- The Uninstall prompt should show up on the phone’s screen.
- Finally, select ‘COMPLETE UNINSTALL’ to uninstall Magisk and restore the stock boot image.
- When the process finishes, reboot your phone.
Once the phone boots, you can safely uninstall/remove the Magisk Manager app as well.
An alternative to the above method is to flash the Magisk Uninstaller zip using TWRP Recovery or by simply restoring the stock boot image if you used Method 2.
Magisk gives you the ability to perform various tasks in order to customize the software. For starters, you can use any root-enabled app on your phone. “Magisk Hide” allows you to hide root from apps like Pokemon Go, and so on. You can also install modules to add third-party features to the software. The possibilities are endless, so don’t stop exploring.
So this was our guide on how to install Magisk on Android and root it. If you have any questions, kindly leave them in the comments.
Почему вы должны изменить свой MAC-адрес?
Несколько причин могут повлиять на ваше решение изменить MAC-адрес. Один из них, если вы хотите скрыться от других сетевых пользователей и устройств. Здесь списки контроля доступа на серверах или маршрутизаторах будут обойдены.
Это также может быть в случае спуфинга MAC, который дает вашему устройству ложную идентификацию (это может быть как в незаконных, так и в законных целях) путем изменения его адреса на MAC-адрес другого устройства, чтобы обмануть вашего интернет-провайдера или локальный домен.
Более того, всем хочется защитить свои устройства от людей с мошенническими намерениями. Подмена MAC-адреса может помочь предотвратить прямой взлом, поскольку злоумышленникам становится невозможным прямой доступ к вашему устройству без фактического адреса.
Ограничения доступа в большинстве сетей основаны на IP-адресе устройства; однако, когда ваш MAC-адрес становится доступным для людей, можно обойти ограничения безопасности такого IP-адреса. Таким образом, спуфинг, безусловно, в ваших интересах.
Как изменить MAC-адрес на устройствах без рута:
Любой желающий может временно изменить MAC-адрес своего смартфона без необходимости root-доступа с помощью этих простых методов.
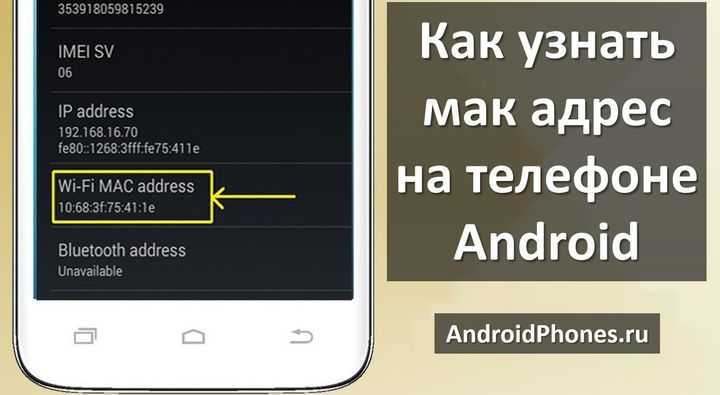
- Прежде всего, получите MAC-адрес вашего устройства Android, который можно получить следующими способами, упомянутыми выше в этой статье.
- Запишите MAC-адрес вашего устройства, а затем загрузите эмулятор терминала Android из магазина приложений Google.
- Откройте приложение и введите команду: «ip link».
- Вызовите MAC-адрес с экрана, заполненного множеством MAc-адресов, и выполните поиск в разделе «link ether» для каждого случая.
- Обычно ссылка, которая соответствует адресу ссылки, является именем соединения. Для большинства устройств Android это «ethO» или «WlanO».
- Теперь введите следующую команду «IP link set wlanO address XX: XX: XX: YY: YY: YY. Здесь walnO – это имя интерфейса, а XX: XX: XX: YY: YY: YY – настраиваемый MAC-адрес в соответствии с требованиями пользователя.
- После этого адрес MAc будет временно изменен, однако после перезапуска устройства адрес MAc автоматически вернется к исходному.
Заметка:
При изменении MAC-адреса необходимо оставить имя производителя неизменным, т.е. XX: XX: XX первые шесть цифр не должны изменяться, они должны совпадать с исходным, иначе это может создать множество проблем с аутентификацией. Этот метод в основном работает с устройствами с процессором Media tec. Таким образом, устройства с процессорами имеют низкие шансы на успех и могут потребовать рутинга их устройства.
Изменение MAC-адреса на корневых устройствах:
После проверки корневого доступа на устройстве пользователи могут легко перейти к изменению адреса MAc на своем Android-устройстве. однако это два способа изменить MAC-адрес на рутированном телефоне, как указано выше.
ChameleMAC:
К сожалению, это приложение, работающее с root-доступом, недоступно в магазине приложений Google. Вы можете установить его в APK.
- Запустите приложение и при появлении запроса предоставьте Root Permission.
- После запуска приложения будут показаны два варианта: один генерирует случайный MAC, а другой применяет новый MAC.
- Затем вы можете ввести новый MAC-адрес в текстовое поле и нажать «Применить новый MAC».
- Теперь нажмите «Создать случайный MAC-адрес», чтобы получить случайный MAC-адрес.
- Появится окно подтверждения, нажмите «изменение”И MAC-адрес устройства изменится соответствующим образом.
Заметка:
Это приложение работает только на устройствах с процессором MediaTek.
Терминал через занятую будку:
Для этого метода на корневом устройстве требуются как окно терминала, так и поле занятости. Даже после перезапуска устройства MAC-адрес, измененный с помощью этого метода, не изменяется, потому что он постоянный.
- Чтобы получить доступ к режиму суперпользователя, запустите приложение окна терминала и введите команду «SU».
- Мы предполагаем, что у вас есть сеть, записанная, в противном случае вы можете ввести «занятый ящик IP link show ethO». Это покажет текущий MAC-адрес на устройстве.
- введите «busybox ipconfig wlano hw ether XX: XX: XX: YY: YY: YY». Запомните ввод для XX: XX; XX: YY: YY: YY изменит MAC-адрес по желанию.
- вот и все, теперь вы успешно изменили адрес MAc на своем устройстве Android, и команда «busybox IP link show etho» покажет только новый измененный MAC-адрес.
Это были простые шаги, как изменить MAC-адрес любого устройства Android и воспользоваться всеми его преимуществами и безопасностью. Каждая техника имеет свои преимущества и возможности, поэтому выберите ту, которая вам удобна. Это со статьей, я надеюсь, что она будет полезна для вас, если у вас есть какие-либо проблемы, и сообщите нам о них в комментарии ниже.
What is Magisk?
![]()
Magisk is a very powerful tool that not only allows users to root their Android device easily but also apply modifications to the software systemless-ly. It is developed by XDA Recognized Developer topjohnwu and is also considered as a true successor to SuperSU, offering even more features and ways to efficiently root devices running the latest Android version.
In 2016, Magisk emerged as a tool to modify the software on Android devices using “Modules” just like the Xposed Framework, but in a more efficient manner. Well, unlike Xposed, Magisk allows users to customize the software without actually altering the /system partition. This means users could still pass Google’s SafetyNet tests and use apps that might rely on it
Progressing further, it gained several new features like “MagiskSU“, a part of the tool itself for effectively rooting Android devices. At the moment, you can install Magisk to root any Android device running Android 10, Pie, Oreo, Nougat, Marshmallow, and Lollipop.
“Magisk Hide” is another notable feature that allows users to hide root from apps that might not work if Root is detected, like Google Pay, Pokemon Go, banking apps, etc.
Below is a list of the major features that Magisk offers:
- Modify or alter the software without tampering the system (vendor) partitions
- Root any Android device with the open-source root solution
- Manage root permissions and use biometrics like fingerprint or Face Unlock to grant superuser permissions
- Pass Google’s SafetyNet tests even when the phone is rooted
- Use banking and security applications on rooted devices
- Remove kernel features like DM-Verity and ForceEncrypt
- Add third-party features using Magisk Modules
- Easily install OTA updates on your rooted Android device
So, if you’re at all interested in modifying the software of your Android device, then you must give a try to Magisk.
Method 2: Via Android Debug Bridge (ADB)
Using the Android Debug Bridge (ADB) tool, you can change the MAC address on your Android device without root. ADB is a versatile command-line tool that allows communication between your computer and Android device. Here’s how you can do it:
![How to install magisk and root android devices with it [2 methods]](https://kokosclub.ru/wp-content/uploads/e/4/f/e4ff6372972c1da93ad8e3c2926c33b6.jpeg)
![Android:rooting_any_device_with_ubuntu [wiki.autosys.tk]](https://kokosclub.ru/wp-content/uploads/e/1/1/e11d4f50913f355428eee1fcd8e519d4.jpeg)
1. Connect your Android device to your computer using a USB cable.
2. On your computer, open a command-line interface (Command Prompt on Windows or Terminal on macOS).
3. Ensure ADB is installed on your computer. You can check this by typing `adb` in the command-line interface. If you receive an error, you need to install ADB. Download the Android SDK Platform-Tools from the Android Developers website and set up ADB.
4. Type the following command to check if your device is connected and recognized by ADB:
«`
adb devices
«`
5. If your device is listed, proceed to the next step. If not, make sure USB debugging is enabled on your Android device and try reconnecting.
6. Type the following command to change your MAC address to a desired one:
«`
adb shell ifconfig wlan0 hw ether XX:XX:XX:YY:YY:YY
«`
Replace `XX:XX:XX:YY:YY:YY` with your desired MAC address.
7. Disable and re-enable Wi-Fi on your Android device.
8. Check if the MAC address is changed by using the appropriate command for your device.
Pros:
1. Can be done using the official Android Debug Bridge tool.
2. No root access required.
3. Offers precise control over the MAC address change.
Cons:
1. Requires setting up ADB on your computer.
2. Command-line interface may not be user-friendly for beginner users.
Как я могу изменить и просмотреть свой MAC-адрес на моем устройстве Android?
Отсюда тот факт, что нам нужен более эффективный способ изменить MAC-адрес с нашего мобильного телефона или узнать адрес мобильного телефона и ПК, поэтому мы спрашиваем себя, как изменить MAC-адрес моего мобильного телефона на Android, не имея root-прав с помощью лучших приложений? Очень легко изменить MAC-адрес вашего мобильного телефона Android не будучи root, вам просто нужно выполнить следующие шаги.
шаг 1
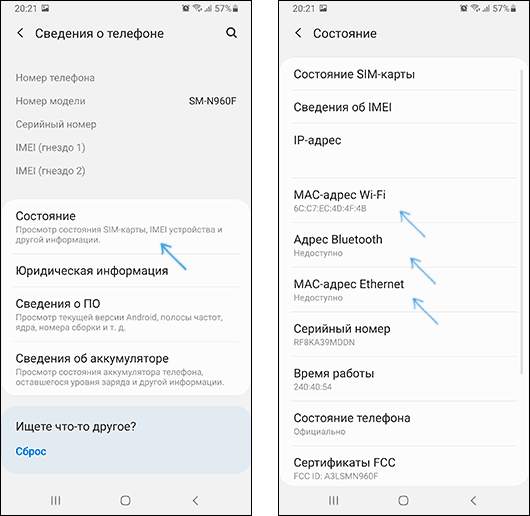
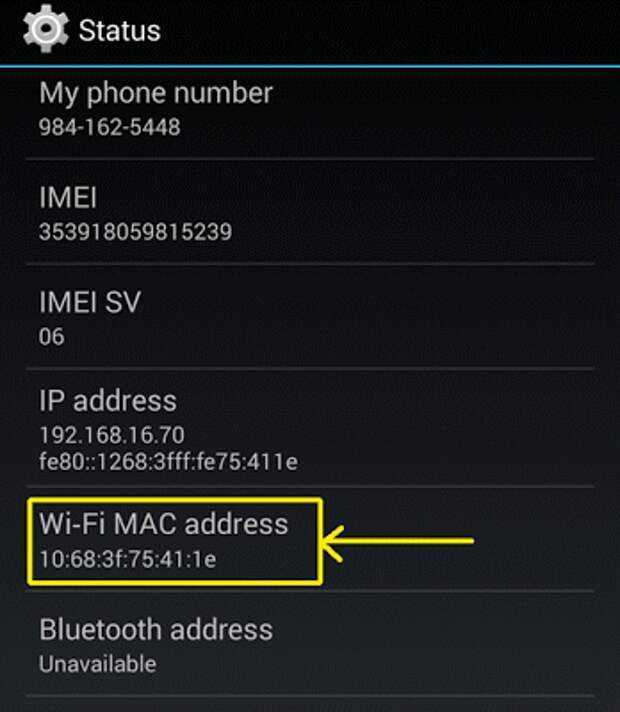
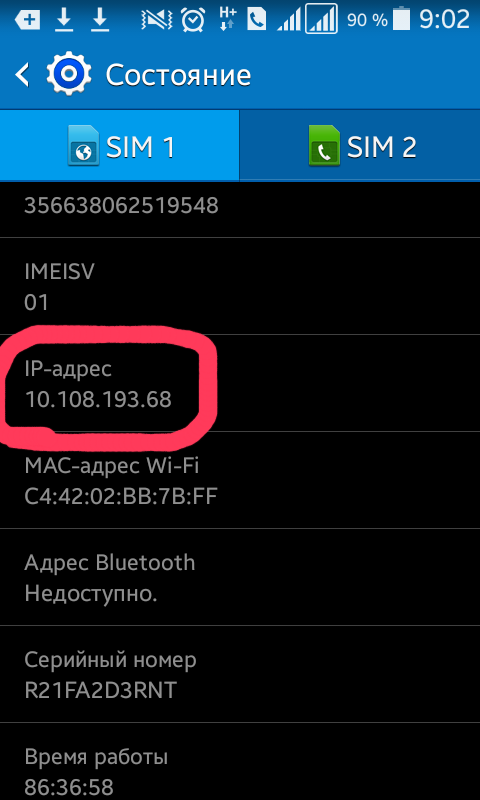
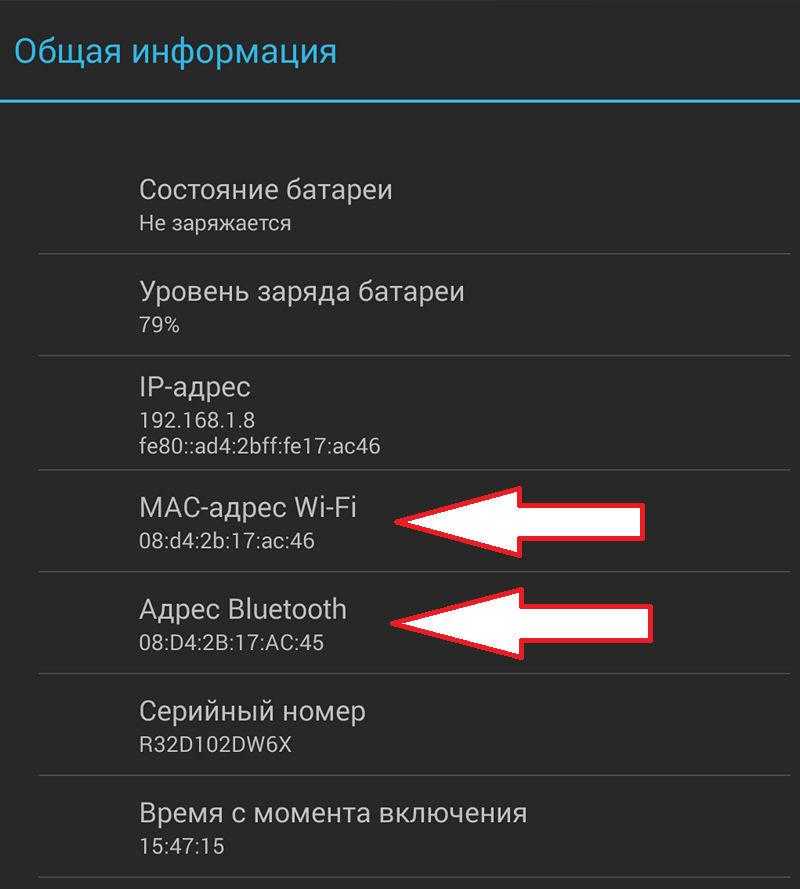
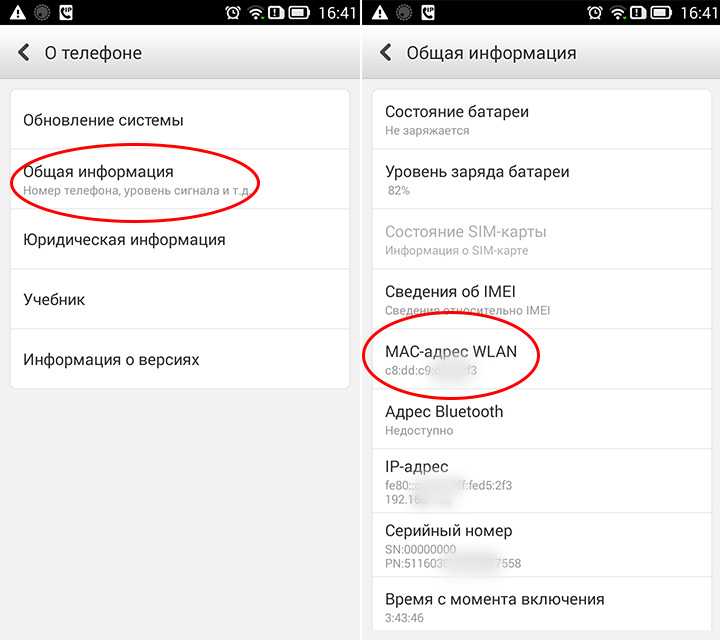
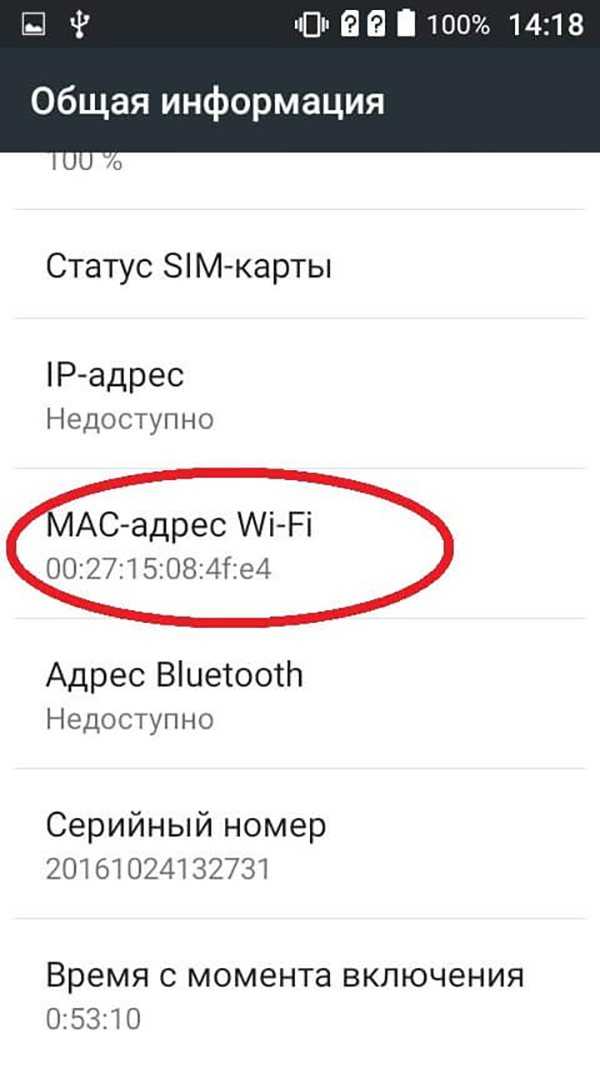
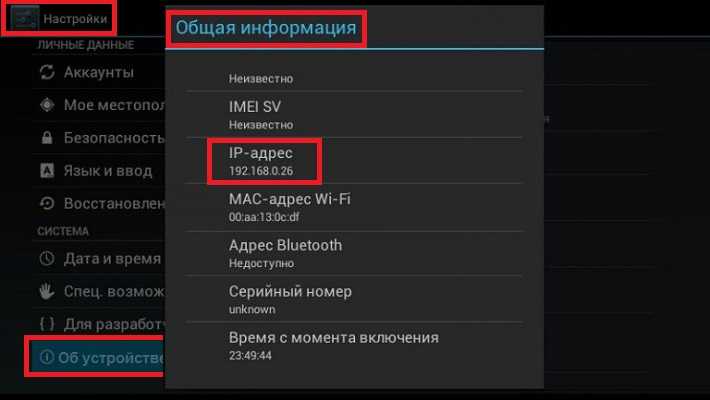
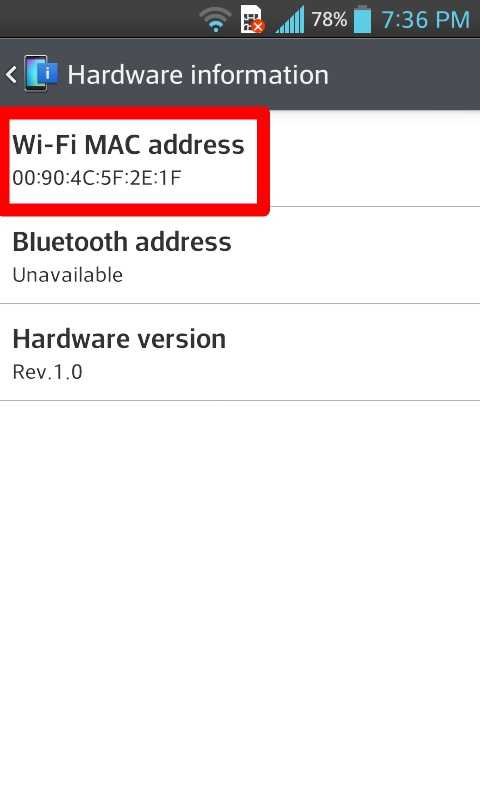
Важно, чтобы у вас ваш текущий MAC-адрес под рукой прежде, чем вы измените его, потому что он вам понадобится позже, чтобы получить свой MAC-адрес, перейдите к параметру настройки, затем список будет разбит, нажмите на телефон, выберите статус
шаг 2
При выборе варианта статуса вы получите автоматически ваш текущий пароль MAC , чтобы не забыть его, запишите его, а затем вы перейдете к загрузке приложения под названием Terminal Emulator для Android, это совершенно бесплатно.
![]()
шаг 4
Скачав, настройте и зайдите в напишите команду «IP link show» (показать IP-ссылку) переведено на испанский. Когда вы выполните предыдущий шаг, вы увидите имя сетевого интерфейса Интернет, имя интерфейса, оно должно быть написано правильно, потому что вам нужно разместить некоторые коды до и после.
Например, представьте, что имя нашего интерфейса «POL8000», напишите набор IP-ссылок POL8000 XX: XX: XX: ZZ: ZZ: ZZ:
шаг 6
Обратите внимание, что XX: XX: XX: ZZ: ZZ: ZZ:, выделенный на шаге 4, также является примером наличия вашего нового MAC-адреса вместо XX: XX: XX: ZZ: ZZ: ZZ: вы должны поместить этот новый адрес. Если вам потребуется внести такие изменения в будущем, выполните указанные выше действия, но помните, что эти изменения не являются сохраняется только до перезапуска сотового телефона
Если вам потребуется внести такие изменения в будущем, выполните указанные выше действия, но помните, что эти изменения не являются сохраняется только до перезапуска сотового телефона.
Changing the MAC Address using Root Access on Your Device
Switching your Mac address can only be performed on Android devices on which you have root access. First, check for root availability on your Android device. Download the free Root Checker app from Google Play.
Don’t worry, the app is simple, and you basically launch after downloading and then tap on the “Verify root” button. This process shows you the status of root on your device, and you will see if root access is currently enabled.
![]()
If the Root Checker app confirmed that your device has root access, then just read on. If not, skip to the next section, where we show you how to change the MAC address on your Android device without having root access.
- Install BusyBox from Google Play.
- Install Terminal Emulator for Android from Google Play.
- Run the terminal emulator app and type “su” (which stands for “super” user), then press “Enter.”
- If the device asks you to allow the app to access root, tap on “Allow.”
- Type “IP link show” and then hit “Enter” again so that you can write down the interface name of your current network. For demonstration purposes here, we will refer to your network interface name as HAL9000.
- Type “busybox ip link HAL9000” (replace HAL9000 with the actual name of your network that you wrote down earlier).
- Your current MAC address will get displayed.
- To change the address, type “busybox config HAL9000 hw ether XX:XX:XX:YY:YY:YY” in the terminal, replacing “XX:XX:XX:YY:YY:YY” with your new MAC address, then press “Enter.”
You now have a new Mac address assigned to your device. Take note that the change is permanent, even after you restart your Android phone.
Проверка измененного MAC-адреса
После того, как вы успешно изменили MAC-адрес на своем устройстве Android, рекомендуется проверить, что изменения были применены правильно. В этом разделе мы рассмотрим несколько способов проверить новый MAC-адрес.
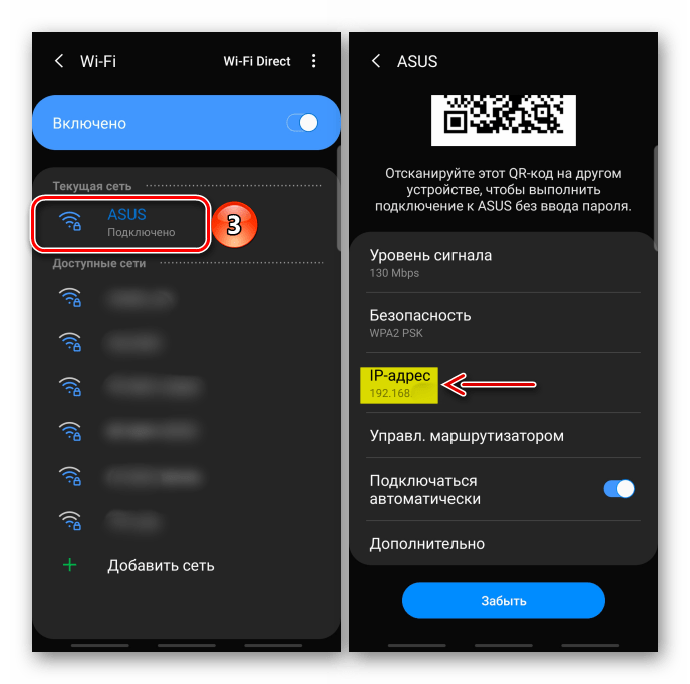
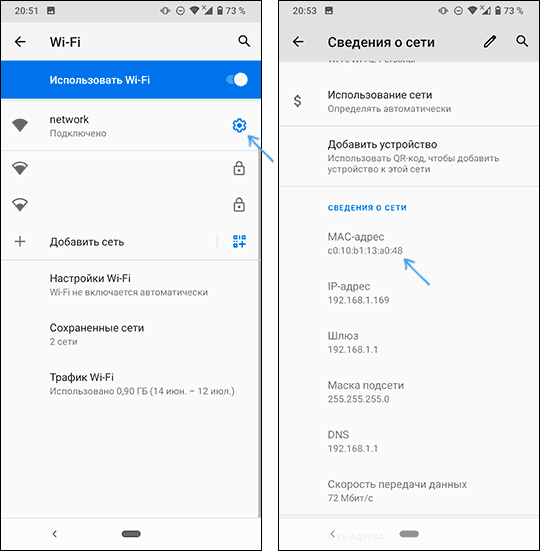
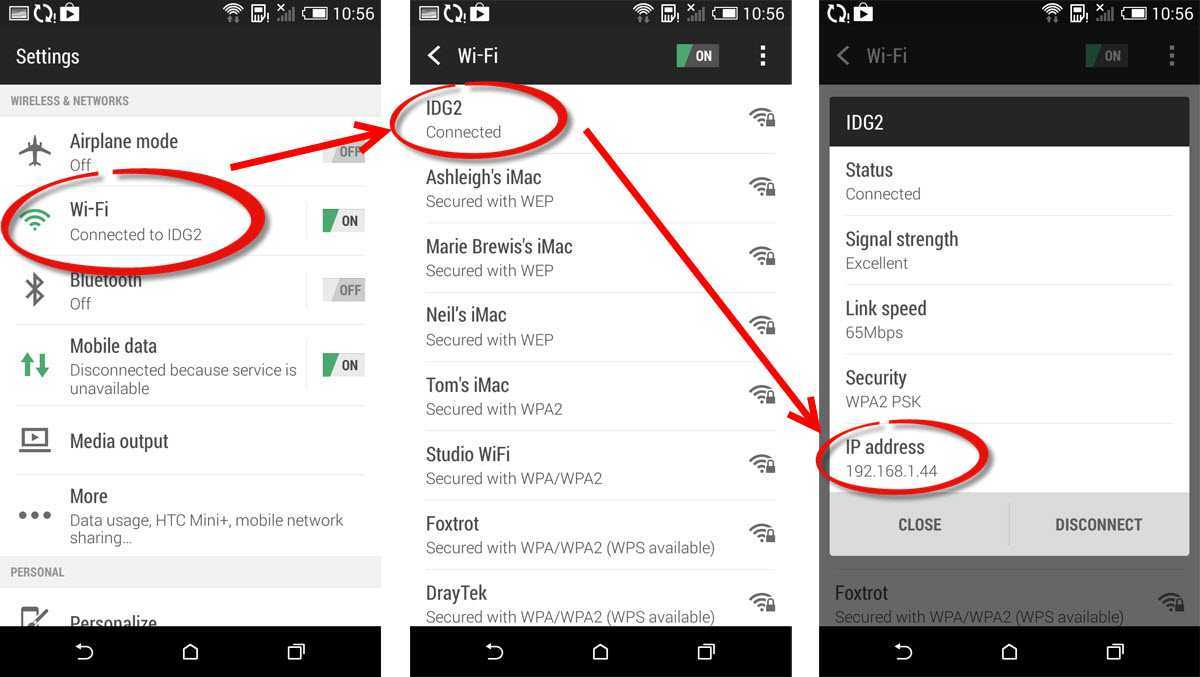
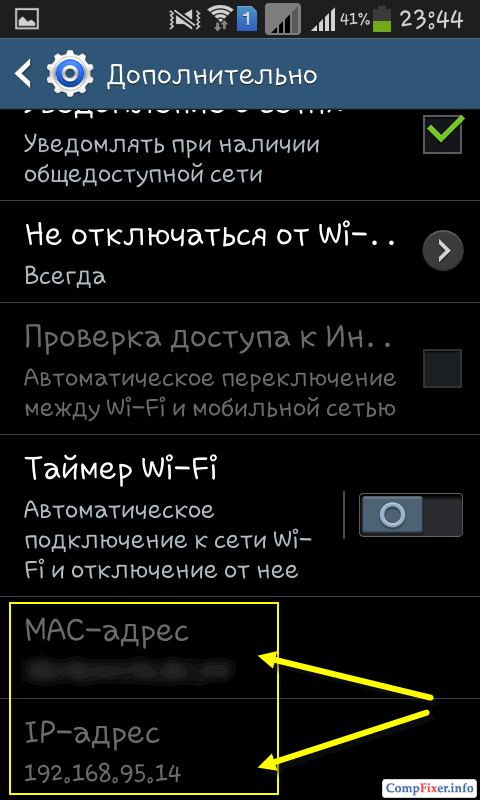
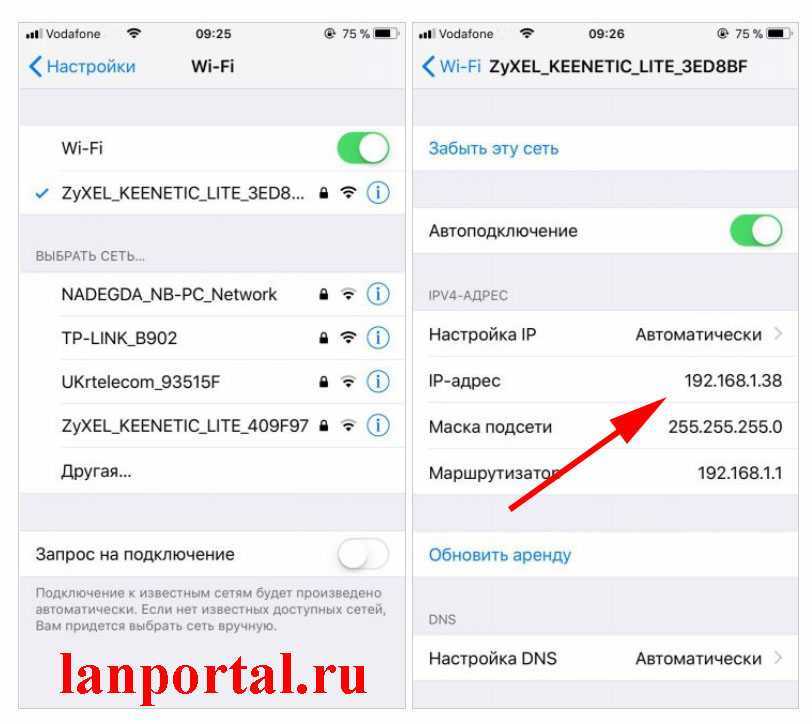
1. Настройки Wi-Fi
Первым способом является проверка MAC-адреса через настройки Wi-Fi на вашем устройстве Android:
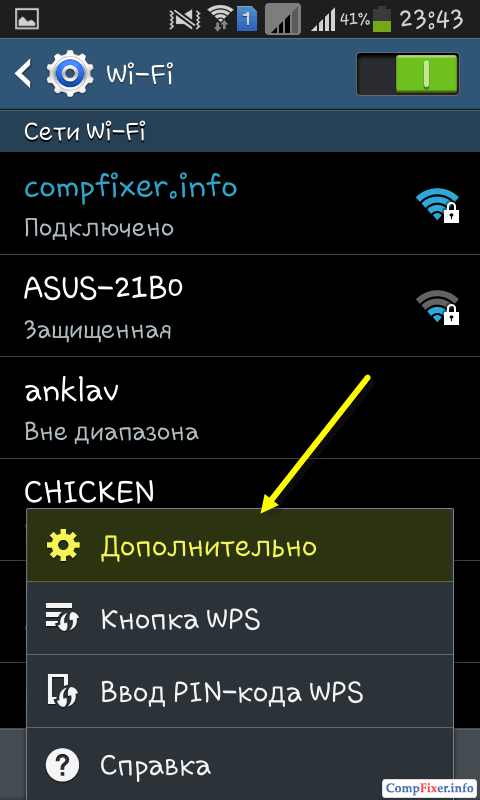
- Откройте «Настройки» на устройстве.
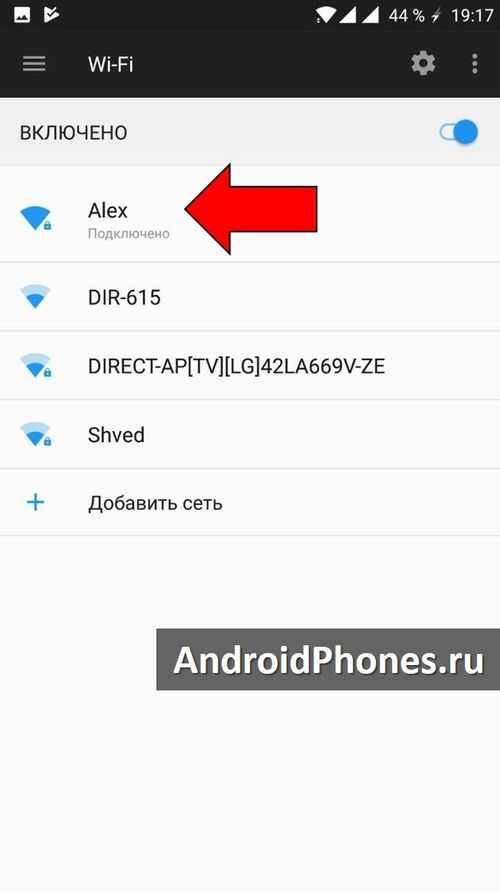
- Перейдите в раздел «Wi-Fi».
- Найдите подключенную сеть Wi-Fi, к которой вы применили изменения MAC-адреса.
- Нажмите и удерживайте на этой сети, чтобы открыть контекстное меню.
- Выберите опцию «Дополнительно» или «Информация о сети».
- В появившемся окне найдите информацию о MAC-адресе. Если новый MAC-адрес отображается здесь, значит изменения применены успешно.
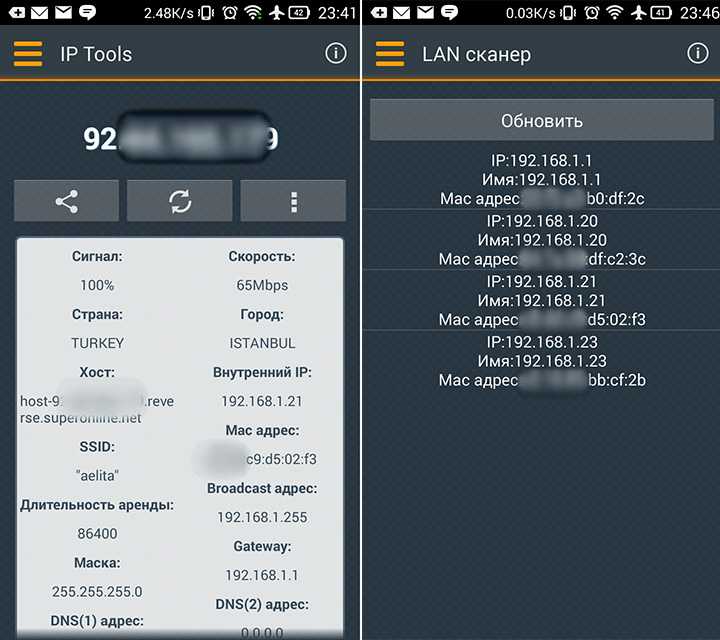
2. Командная строка
Если вы предпочитаете использовать командную строку на устройстве Android, вы можете проверить измененный MAC-адрес с помощью следующих шагов:
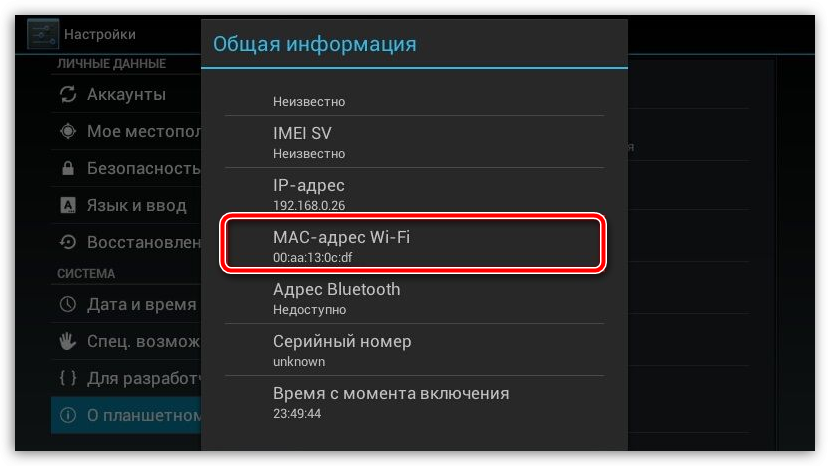
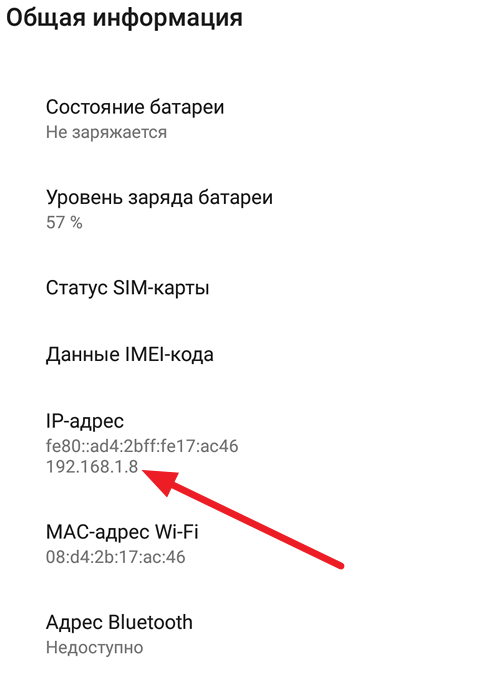
- Откройте «Настройки» на устройстве.
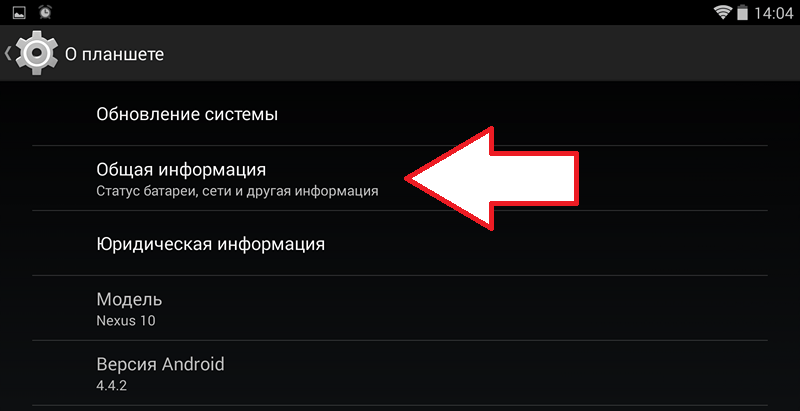
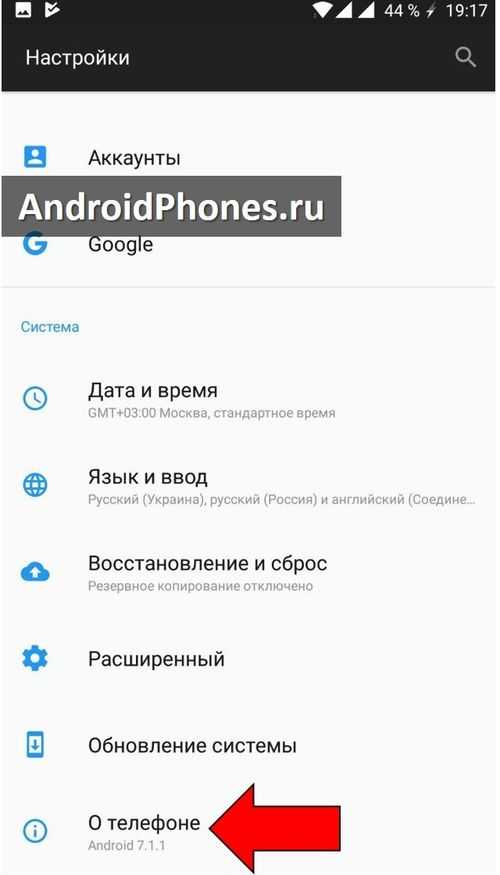
- Перейдите в раздел «О телефоне» или «О планшете».
- Найдите и нажмите на «Информация о программном обеспечении» или «Версия ОС».
- В появившемся окне найдите и нажмите на «Введите» или «Тестирование».
- Введите следующую команду: ip link show wlan0.
- Найдите строку, содержащую информацию о MAC-адресе. Если новый MAC-адрес отображается здесь, значит изменения применены успешно.
Если вы успешно проверили новый MAC-адрес с использованием одного из этих способов, значит вы успешно изменили MAC-адрес на своем устройстве Android и готовы использовать его с новыми параметрами.
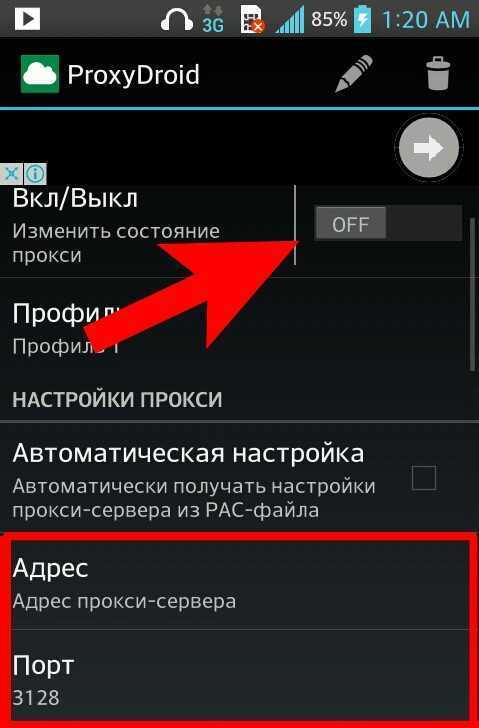
Изменение Mac адреса
- Запустите приложение для изменения Mac адреса.
- Обычно данное приложение предоставляет список доступных сетевых адаптеров на вашем устройстве Android. Выберите тот адаптер, Mac адрес которого вы хотите изменить.
- Введите новый Mac адрес в соответствующее поле.
- Нажмите кнопку «Сохранить» или «Применить», чтобы применить изменения.
- Перезагрузите устройство, чтобы изменения вступили в силу.
После перезагрузки устройства выполните проверку, чтобы убедиться, что изменение Mac адреса успешно произошло.
Важно помнить, что изменение Mac адреса может быть незаконным или нарушать политику использования сети. Поэтому, прежде чем изменять Mac адрес, убедитесь, что вы делаете это в рамках закона и с разрешения владельца сети или администратора
Резервное копирование через ПК
![]()
Если у вас есть доступ к компьютеру, вы также можете создать резервную копию настроек и данных через ПК. Для этого понадобится специальное программное обеспечение, например, Android Debug Bridge (ADB) или программы от производителя устройства. Следуйте этим инструкциям для создания резервной копии:

- Подключите устройство к компьютеру с помощью USB-кабеля.
- Включите режим отладки USB на устройстве. Эта опция находится в разделе «Разработчик» в настройках устройства. Если раздел «Разработчик» не отображается, включите его, нажав на номер сборки в разделе «О телефоне» несколько раз.
- Установите необходимое программное обеспечение (например, ADB) на компьютер.
- Откройте командную строку или терминал на компьютере и выполните команду «adb backup -all» для создания полной резервной копии данных и настроек.
- Следуйте инструкциям на экране и разрешите доступ к устройству при необходимости.
- Дождитесь завершения процесса и сохраните файл резервной копии на компьютере.
In Conclusion
While changing the MAC address on an Android device without root access can pose challenges, the methods mentioned in this blog post provide workarounds and alternative approaches. Whether you choose to use a Terminal Emulator, ADB, MAC address changer apps, or custom ROMs, it is crucial to understand the implications and limitations of each method. By following the instructions and taking necessary precautions, you can successfully change your Android device’s MAC address without root. Remember to use these methods responsibly and in compliance with the laws and regulations of your country or region.
Method 1: Using Terminal Emulator
Using a Terminal Emulator app, you can change the MAC address on your Android device without root. Terminal Emulator provides a command-line interface that allows you to execute commands on your Android device. Here’s how you can do it:
1. Download and install a Terminal Emulator app from the Google Play Store, such as «Termux.»
2. Open the Terminal Emulator app and grant it the necessary permissions.
3. Type the following command to check your device’s current MAC address:
«`
busybox ifconfig wlan0 | grep ‘HWaddr’ | awk ‘{ print $5}’
«`
4. Make a note of your current MAC address.
5. Disable Wi-Fi on your Android device.
6. Type the following command to change your MAC address to a desired one:
«`
su -c ‘busybox ifconfig wlan0 hw ether XX:XX:XX:YY:YY:YY’
«`
Replace `XX:XX:XX:YY:YY:YY` with your desired MAC address.
7. Enable Wi-Fi on your Android device and check if the MAC address is changed by using the command in step 3.
Pros:
1. No root access required.
2. Terminal Emulator apps are readily available on the Google Play Store.
3. Allows precise control over the MAC address change.
Cons:
1. Requires typing commands and understanding the command-line interface.
2. Terminal Emulator apps may vary in terms of user interface and features.
Method 3: Using Mac Address Changer Apps
Certain third-party apps available on the Google Play Store can assist in changing the MAC address on your Android device without root access. These apps provide a user-friendly interface and simplify the process. Here’s how you can do it:
1. Download and install a MAC address changer app from the Google Play Store, such as «WiFi Mac Changer.»
2. Open the app and grant it the necessary permissions.
3. Follow the app’s instructions to change your MAC address.
4. Disable and re-enable Wi-Fi on your Android device.
5. Check if the MAC address is changed by using the appropriate command for your device.
Pros:
1. No need to type complicated commands.
2. User-friendly interface.
3. Multiple apps available with varying features.
Cons:
1. Apps may have limitations based on device compatibility and Android version.
2. Some apps may contain advertisements or require in-app purchases for full functionality.
Steps to Spoof MAC Address of your Android Phone [Manually]
This guide works mostly on Android devices powered by the MediaTek processor and only a temporary change in MAC Address can be done using this method. Once you restart your Android device, the MAC reverts to the old one. I have shared two easiest way to change MAC address via Apps and manually. You can try both the methods or anyone! Let’s get started!
Change MAC Address of Android Devices without Root Access
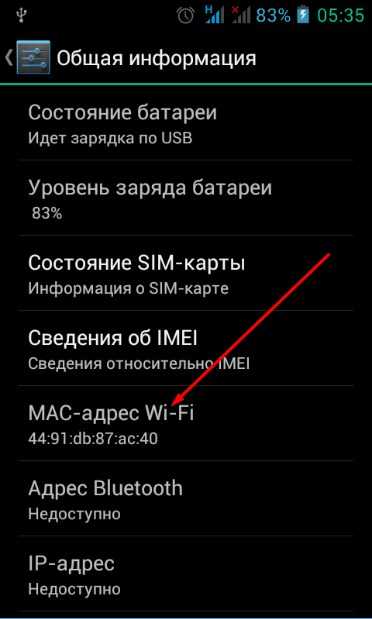
- Go to Settings>About Phone>Select Status and then make a note of the current MAC Address of your Android device.
- Download the Android Terminal Emulator application from the Google Play Store. You can directly navigate to the Android Terminal Emulator Google Play Store download page by clicking here.
- Launch the above application on your Android device and then type “IP LINK SHOW”.
- Note the interface name of your Android device from the list.
- And then type in the command below,
ip link set interfacename XX:XX:XX:YY:YY:YY
- Replace interfacename with the Interface Name of your network that you noted in Step 4 above and XX:XX:XX:YY:YY:YY with the MAC Address you wish to set.
- And that’s it. The MAC Address of your Android device will now be modified/changed.
Change MAC Address of Android devices with Root Access
- This guide only works on rooted Android devices.
- You need the Busybox app for Android installed on your device. You can download and install the Busybox Android application from here.
- Also, download and install the Terminal Window Android app on your Android device from here.
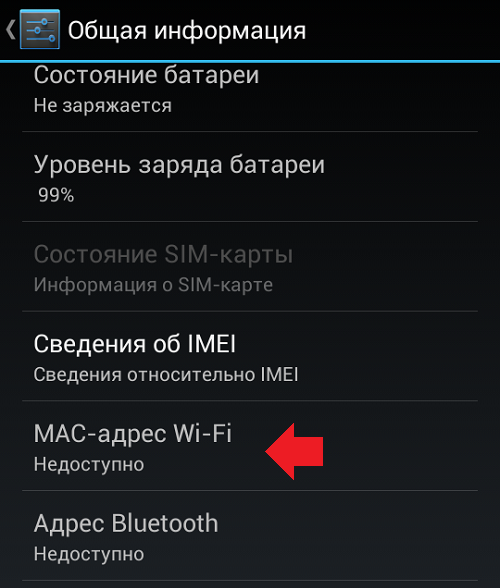
- Launch the app and enter the command below. It will display the current MAC Address of your Android device.
busybox ip link show eth0
Type the command shared below,
busybox ifconfig etho0 hw ether XX:XX:XX:YY:YY:YY
- Replace ” XX:XX:XX:YY:YY:YY ” with the MAC Address of your choice.
- And it’s completed. You can now use the command in Step 4 above to verify whether the MAC Address has changed or not.
Enjoyed this quick and detailed guide on how to modify/change MAC Address of Android devices? Then do spread the word and share this article.
Stay tuned for more updates on Android Tricks 2017!
Насколько важно заботиться о нашем MAC-адресе и знать его?
Это то, что MAC, теперь кто угодно или в этих случаях хакеры могут узнать ваш пароль. Это очень сложно, потому что они могут получить доступ ко всей информации, вакансиям, транзакциям, которые вы делаете, украв вашу конфиденциальность. В наши дни эти преступные хакерские действия стали очень распространенными, и вы можете заметить это, посмотрев новости.
В этой новости вы увидите информацию о том, что даже есть страны, взламывающие конфиденциальную информацию из других стран, и приятно знать, что существуют приложения для защиты ваших устройств.
![]()
И чтобы не заходить слишком далеко, людей, которые взламывают эти пароли MAC, внимательно слышат, их цель — подключиться к Интернету и получить доступ к любому устройству в Интернете, которое находятся в целом подключены друг к другу ПК, мобильный, планшет.
Но это может пойти дальше, эти хакеры могут изменить ваш собственный MAC-адрес и поставить его.
Эти могут ограничить MAC-адреса, которые к нему подключаются , без возможности поиска их перемещений со своего собственного MAC-адреса, это еще хуже, когда вы подключаетесь к бесплатным сетям Wi-Fi, поскольку они могут легко отслеживать ваше устройство.
Если у них есть ваш MAC-адрес, они могут совершать преступления, за которые в худшем случае можно заплатить в тюрьме, многие хотят работать в сети, не имея никаких ограничение безопасности IP-адрес, поэтому они крадут ваш MAC-адрес.
How to Install Magisk on Android
Now, as we mentioned in the beginning, there are two different ways/methods to install Magisk on Android. The first method is by flashing the latest Magisk installer ZIP file using TWRP, which is the easiest.
But if TWRP recovery is not yet available for your device or if you just want to root, then you can use the second method. It involves patching the stock boot image (kernel) using Magisk and then flashing the Magisk patched boot image to your Android phone via fastboot. This is also the recommended method since it will allow you to easily install OTA updates on your rooted Android phone.
We have covered instructions for both the methods below in a step-by-step manner.
Method 1: By Flashing Magisk Installer Zip using TWRP Recovery
- Download the latest Magisk installer zip: Download link
- Connect your phone to the PC using the USB cable and enable MTP/File Transfer mode.
- Copy the downloaded Magisk zip file (e.g. Magisk-v20.3.zip) to the device’s internal storage or SD card.
- Now, boot your Android device into TWRP recovery using the relevant key combination.
- Alternatively, you can also use the following ADB command while your device is connected with USB debugging enabled:
adb reboot recovery
- Tap on ‘Install’ in the TWRP main screen.
- Navigate to the phone’s internal/external storage and select the Magisk installer zip file (e.g. Magisk-v20.3.zip).
- The file will be added to the TWRP flashing queue.
- Finally, swipe the button on the bottom of the screen to flash the file and install Magisk on your Android device.
- When the flashing process is complete, hit the “Reboot System” button.
Alongside rooting, Magisk also simultaneously patches/disables any kernel-level security features (like DM-verity) that may prevent your phone from booting if the software is modified.
After your Android phone boots, you will see the latest Magisk Manager app present in the app drawer. Simply run it to verify that Magisk has been installed.

Method 2: By Flashing Magisk Patched Boot Image using Fastboot
If your device doesn’t support TWRP recovery or you don’t want to install it for some reason, then follow the steps below to install Magisk by flashing the Magisk Patched Boot image. This method also allows you to easily take OTA updates on your rooted Android device.
- First, get the stock boot image for the current firmware installed on your Android device.
- Transfer the boot image file to the phone’s internal or external storage.
- Download the latest Magisk Manager APK file from here and install it on your device.
- Now go to the app drawer and launch the ‘Magisk Manager’ app.
- Tap on the ‘Install’ button and choose ‘Install’ again.
- Select the ‘Select and Patch a File’ option.
- Navigate to the storage and select the stock boot image file (e.g. boot.img) that you transferred earlier.
- Magisk Manager will now patch the stock boot image with the latest version of Magisk.
- Once patched, the patched boot image (magisk_patched.img) file will be stored in the ‘Download’ folder of your phone’s internal storage.
- Transfer the resultant file from the phone’s storage to the folder on the PC where the Android platform-tools are installed.
- Boot your Android device into Bootloader/Fastboot mode and connect it to the PC using the USB cable.
- Now, launch the command-line window (PowerShell in Windows or Terminal in macOS/Linux) on your PC.
- Enter the following command in the PowerShell window to ensure that your Android device is being detected properly by fastboot:
fastboot devices
- Finally, enter the following command to flash the patched boot image and install Magisk on your Android device:
fastboot flash boot magisk_patched.img
- Note: The Magisk Patched Boot image will be flashed to your phone’s current active slot.
- Once done, reboot your phone using:
fastboot reboot
When your phone boots, open the Magisk Manager to verify the installation. You may further download various modules from the official repository or from here. The official documentation is a good way to start with the basics and also to know what Magisk is capable of.
Recommended:
- Guide to Install OTA Updates on your device rooted with Magisk
- How to Fix Bootloops caused by Magisk Modules
- How to Install TWRP Recovery on Android?
Why Modify/Change MAC Address of Android Devices?
![]()
There may be many reasons which would require you to change the MAC Address of your Android devices, some of them are listed below:
- Changing or modifying the MAC Address of your Android devices helps in preventing any potential hackers to keep a track of your Android device even if they are connected to the same WIFI network as yours.
- Certain Internet Service Providers provide internet connection to its registered users by recognising the MAC Address of the device used by the user. In case you are accessing your ISP from a different device then modifying the MAC Address of your Android device will help you get back online in no time, rather than contacting the ISP and resolving the issue.
- The MAC Address of your personal Android device is a very sensitive piece of information as it is unique for every device. In case someone performs some malicious online activities by using your Android device’s MAC Address, you may end up being responsible for such actions.
Why Can’t I Change Android Mac Address without Root?
Changing the MAC address on an Android device without root access can be challenging due to a few reasons:
1. Limitations imposed by manufacturers: Manufacturers lock down certain device settings to prevent unauthorized modifications. Changing the MAC address is often restricted to prevent misuse or other security concerns.
2. System-level permissions: Changing the MAC address requires modifying system-level settings, which typically require root access. Without root, the necessary permissions are not granted.
3. Hardware restrictions: Some hardware components, such as network interface controllers (NICs), have limitations that prevent MAC address modifications without root access.
To fix these limitations and change the MAC address without root, the methods mentioned earlier utilize workarounds and alternative approaches to modify the MAC address.


